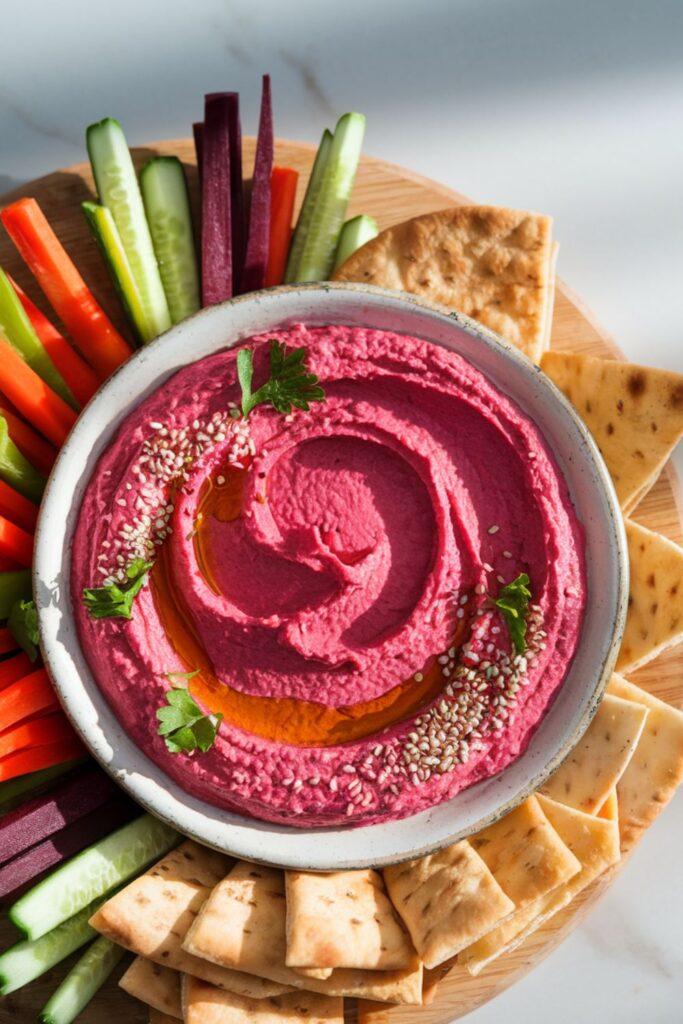
1. Beet Hummus Platter
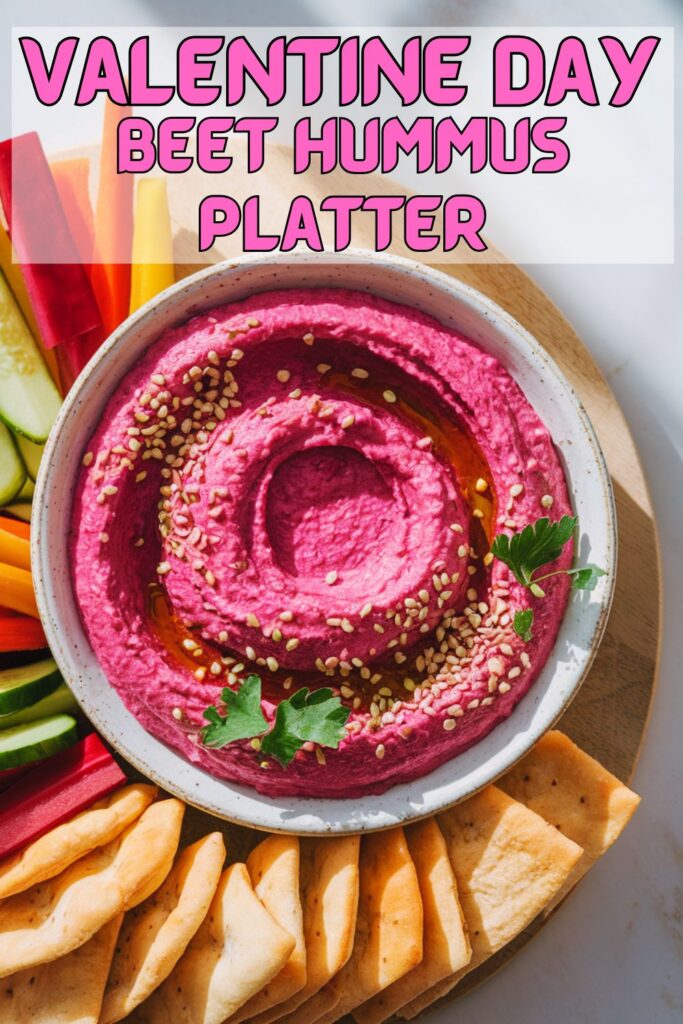
This vibrant pink beet hummus isn’t just a feast for the eyes; it’s a nutritious, flavor-packed dip that’s perfect for any occasion. The earthy sweetness of roasted beets pairs beautifully with creamy chickpeas and tangy lemon juice. It’s vegan, gluten-free, and loaded with fiber, antioxidants, and plant-based protein. Whether you’re hosting a Valentine’s-themed party or simply elevating snack time, this beet hummus will steal the show.
Ingredients
- 1 can (15 oz) chickpeas, drained and rinsed
- 1 medium roasted beet, peeled and diced
- 2 tablespoons tahini
- 2 tablespoons fresh lemon juice
- 1 garlic clove, peeled
- 2 tablespoons olive oil (optional, for extra creaminess)
- ½ teaspoon salt (or to taste)
- ¼ teaspoon ground cumin (optional, for added flavor)
Equipment List
- Food processor or high-speed blender
- Baking sheet (for roasting the beet)
- Parchment paper (optional)
- Knife and cutting board
- Measuring spoons
Preparation Time
- Active prep: 15 minutes
- Roasting time for the beet: 45 minutes
- Total time: 1 hour
Step-by-Step Instructions
Step 1: Roast the Beet
- Preheat your oven to 400°F (200°C).
- Wash the beet thoroughly and trim off the ends. Wrap it in aluminum foil or place it on a baking sheet lined with parchment paper.
- Roast the beet for about 45 minutes, or until it’s fork-tender. Allow it to cool before peeling off the skin (it should slide off easily).
Step 2: Prepare the Ingredients
- Drain and rinse the chickpeas thoroughly to reduce sodium and achieve a smoother texture.
- Peel and dice the roasted beet into small chunks for easier blending.
Step 3: Blend the Hummus
- In a food processor or high-speed blender, combine the chickpeas, roasted beet, tahini, lemon juice, and garlic clove.
- Blend on high speed until smooth, scraping down the sides as needed. If the mixture seems too thick, add 1-2 tablespoons of water or olive oil and blend again.
- Taste and adjust seasoning by adding salt or cumin if desired.
Step 4: Serve
- Transfer the beet hummus to a serving bowl and use the back of a spoon to create swirls on the surface.
- Garnish with a drizzle of olive oil, sesame seeds, or chopped fresh parsley for added flair.
- Serve with veggie sticks (like carrots, cucumbers, and bell peppers) and pita chips.
Useful Tips
- Roasting Shortcut: If you’re short on time, use pre-cooked beets, available in the refrigerated section of most grocery stores.
- Make It Creamier: Adding a few tablespoons of ice-cold water while blending can help achieve an ultra-smooth texture.
- Storage: Store the hummus in an airtight container in the refrigerator for up to 5 days. It’s perfect for meal prep!
- Add a Twist: Experiment with spices like smoked paprika or coriander to give the hummus a unique flavor profile.
- Serving Ideas: Pair it with crackers, naan bread, or even as a spread for sandwiches and wraps.
2. Heart-Shaped Mini Quiches: A Step-by-Step Guide

These adorable heart-shaped mini quiches are the ultimate savory treat for buffets, parties, or romantic brunches. Their charming shape and customizable filling make them a hit for guests of all ages. Whether it’s Valentine’s Day or just a special gathering, these quiches will bring love to the table.
Ingredients
- 3 large eggs
- 1/2 cup milk
- 1/2 cup shredded cheese (cheddar, mozzarella, or your choice)
- 1/2 cup diced veggies (spinach, bell peppers, mushrooms, etc.)
- Optional: salt, pepper, and spices to taste
Equipment List
- Heart-shaped muffin tin
- Whisk
- Mixing bowl
- Measuring cups
- Non-stick spray
Preparation Time
- Prep Time: 10 minutes
- Cook Time: 15–18 minutes
- Total Time: 25–28 minutes
Step-by-Step Instructions
- Preheat the Oven: Set your oven to 375°F (190°C) and spray the heart-shaped muffin tin with non-stick spray.
- Prepare the Egg Mixture: In a mixing bowl, whisk together the eggs, milk, and any desired seasonings until well combined.
- Fill the Tin: Evenly distribute the diced veggies and shredded cheese into each cavity of the muffin tin.
- Add the Egg Mixture: Carefully pour the egg mixture over the veggies and cheese, filling each cavity about three-quarters full.
- Bake: Place the tin in the oven and bake for 15–18 minutes, or until the quiches are puffed up and set in the center.
- Cool and Serve: Allow the quiches to cool for a few minutes before removing them from the tin. Serve warm or at room temperature.
Tips for Success
- Grease Well: Ensure the muffin tin is thoroughly greased to prevent sticking.
- Even Filling: Chop veggies finely to ensure even distribution and cooking.
- Experiment with Flavors: Try adding cooked bacon, ham, or fresh herbs for added flavor.
- Make Ahead: These quiches can be made a day in advance and reheated in the oven at 350°F for 5 minutes.
3. Flaky Puff Pastry Bites with Pesto and Cheese
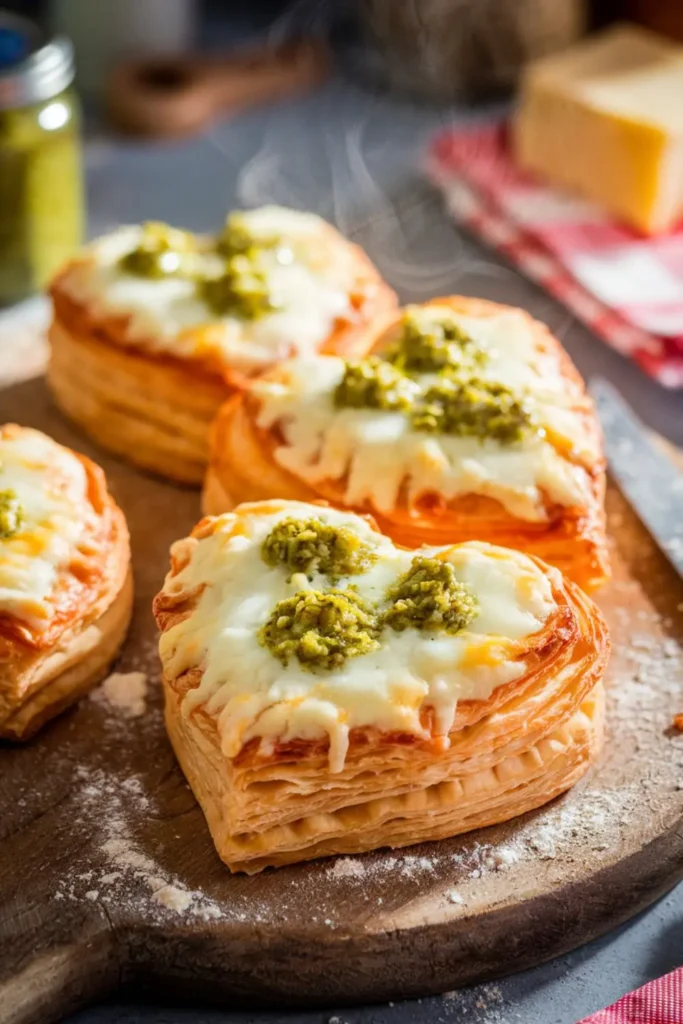
These flaky, buttery puff pastry bites are topped with a savory pesto and cheese filling, making them the perfect appetizer for any gathering. Whether you’re hosting a party or looking for an easy snack to impress your family, these bites are as simple as they are delicious.
Ingredients
- 1 sheet puff pastry, thawed
- 1/4 cup pesto (store-bought or homemade)
- 1/4 cup shredded cheese (Parmesan, mozzarella, or a blend)
Equipment List
- Baking sheet
- Parchment paper
- Knife or cookie cutter
- Small spoon
Preparation Time
- Prep Time: 15 minutes
- Cook Time: 12–15 minutes
- Total Time: 30 minutes
Step-By-Step Instructions
- Preheat the Oven: Preheat your oven to 400°F (200°C) and line a baking sheet with parchment paper.
- Prepare the Puff Pastry: Roll out the thawed puff pastry on a floured surface. Using a heart-shaped cookie cutter or knife, cut out 12 hearts.
- Score the Pastry: Using a knife, lightly score a smaller heart shape about 1 cm inside the edge of each piece. Be careful not to cut all the way through—this creates a raised border to hold the filling.
- Add the Toppings: Spread a small amount of pesto within the scored area of each pastry heart. Sprinkle shredded cheese on top of the pesto.
- Bake: Place the prepared puff pastry hearts on the lined baking sheet and bake for 12–15 minutes, or until the pastry is golden and flaky.
- Cool and Serve: Allow the bites to cool slightly before serving.
Useful Tips
- Thaw Properly: Ensure the puff pastry is fully thawed but still cold for easy handling.
- Customize: Swap out pesto for tomato sauce, tapenade, or cream cheese, and experiment with different cheeses.
- Even Baking: Use a preheated oven and place the tray in the center for consistent results.
Serve these delightful bites warm or at room temperature for a crowd-pleasing treat that’s sure to disappear quickly!
4. Smoked Salmon and Cream Cheese Cucumber Hearts
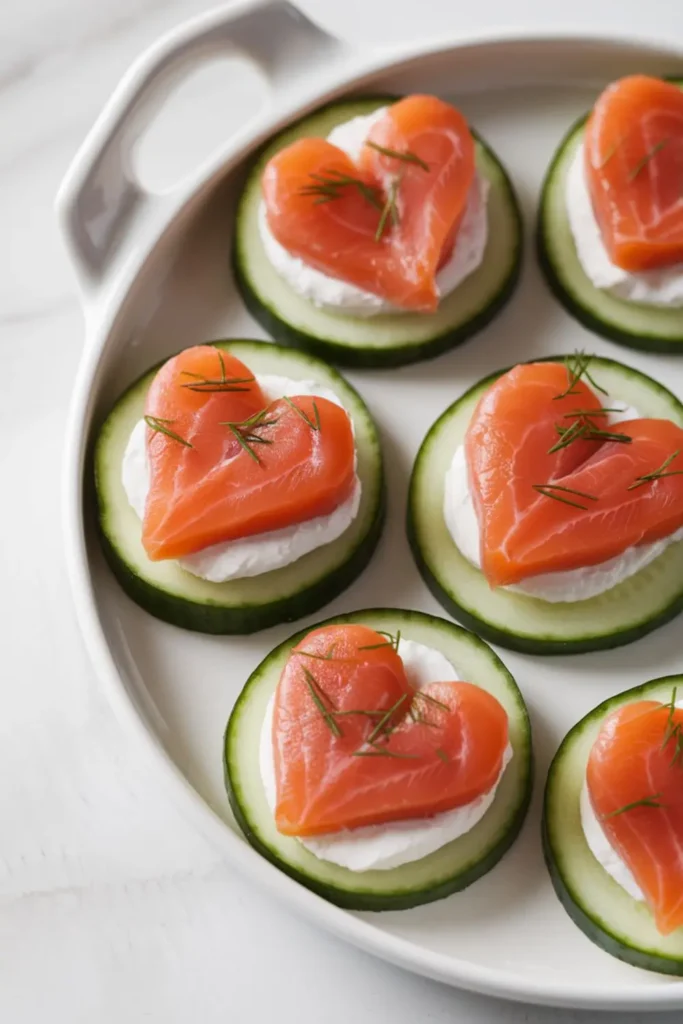
These elegant cucumber hearts with smoked salmon and cream cheese make a delightful, no-cook appetizer that’s perfect for Valentine’s Day or any special occasion.
Ingredients
- 1 cucumber, sliced into 12 rounds
- ¼ cup cream cheese, softened
- 2 oz smoked salmon
- Optional garnish: Chopped chives or dill
Equipment List
- Sharp knife
- Small heart-shaped cookie cutter
- Spreader or small spoon
- Serving platter
Preparation Time
- Prep Time: 10 minutes
- Total Time: 10 minutes
Step-by-Step Instructions
- Prepare the Cucumber: Wash the cucumber thoroughly. Slice it into 12 even rounds, about ¼-inch thick, and arrange them on a serving platter.
- Shape the Salmon: Use a heart-shaped cookie cutter to cut the smoked salmon into small hearts. Set aside.
- Spread the Cream Cheese: Use a small spoon or spreader to add a dollop of cream cheese onto each cucumber slice. Smooth it out gently for an even layer.
- Top with Salmon: Place a heart-shaped smoked salmon piece on top of the cream cheese layer.
- Garnish and Serve: For an optional touch, sprinkle with chopped chives or dill for a pop of color and added flavor.
Tips for Success
- Softened Cream Cheese: Ensure the cream cheese is at room temperature for easy spreading.
- Uniform Slices: Cut the cucumber evenly to ensure consistent presentation and balance.
- Storage: Cover with plastic wrap and refrigerate for up to 4 hours before serving to keep them fresh.
- Variations: Add a squeeze of lemon juice or a sprinkle of cracked black pepper for extra flavor.
These smoked salmon cucumber hearts are a surefire way to elevate your appetizer game with minimal effort. Give them a try and wow your guests!
5. Heart-Shaped Grilled Cheese for Valentine’s Day
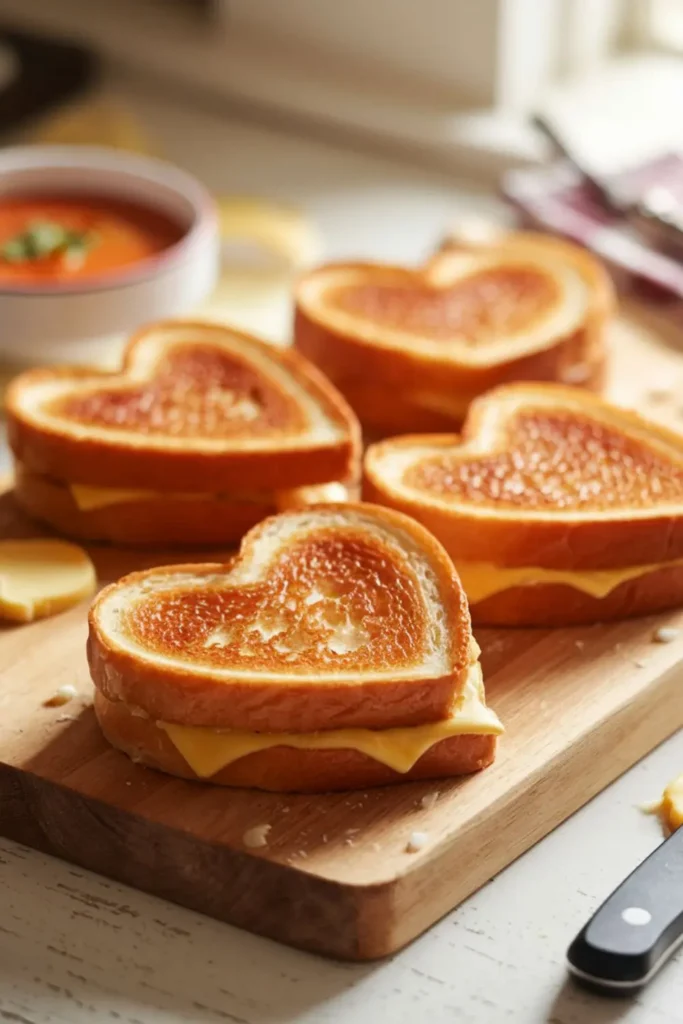
Who doesn’t love grilled cheese? These adorable, bite-sized, heart-shaped sandwiches take a classic comfort food and make it extra special for Valentine’s Day! Perfect for dipping into a warm bowl of tomato soup, they’re ideal as a romantic appetizer or a treat for kids.
Ingredients
- 6 slices of bread
- ½ cup shredded cheddar cheese
- 2 tbsp butter
Equipment List
- Heart-shaped cookie cutter
- Non-stick skillet or griddle
- Spatula
Preparation Time
- Prep Time: 10 minutes
- Cook Time: 8-10 minutes
- Total Time: 20 minutes
Step-by-Step Instructions
- Prepare the Bread:
Using a heart-shaped cookie cutter, cut out heart shapes from the slices of bread. You should get 2-3 hearts per slice, depending on size. - Assemble the Sandwiches:
Place shredded cheddar cheese evenly between two bread hearts to create sandwiches. - Butter the Bread:
Spread a thin, even layer of butter on the outside of each sandwich. This ensures a crispy, golden crust. - Grill to Perfection:
Heat a non-stick skillet or griddle over medium heat. Place sandwiches on the hot surface and cook for 3-4 minutes on each side, or until golden brown and the cheese is melted. - Serve Warm:
Remove from the skillet and serve immediately with your favorite tomato soup for dipping.
Tips for Success
- Cheese Choice: Cheddar melts beautifully, but you can try mozzarella, gouda, or a mix for a unique flavor.
- Prevent Burning: Cook over medium heat to ensure even browning without burning the bread.
- Use Fresh Bread: Soft, fresh bread cuts easily with cookie cutters and grills well.
These heart-shaped grilled cheese sandwiches are guaranteed to warm hearts and stomachs. Enjoy them as a delightful snack or appetizer for a cozy Valentine’s Day celebration!
Also Try- Special Valentine Day Cocktail Recipes 20 Delightful ideas 2025
6. Cupid’s Shrimp Cocktail
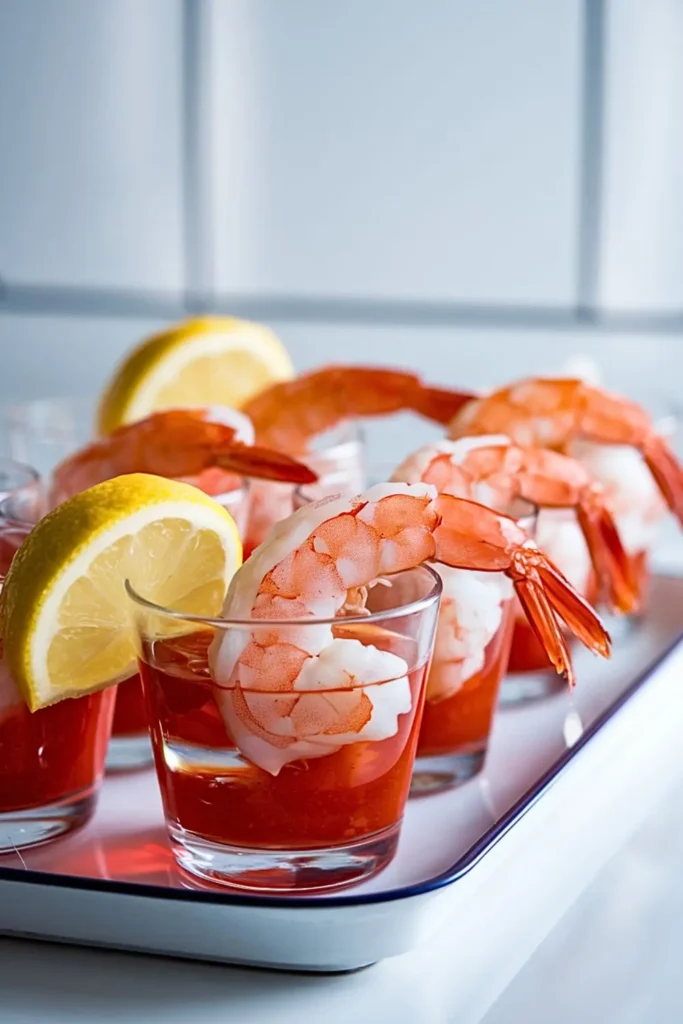
This classic shrimp cocktail combines elegance with simplicity, making it perfect for Valentine’s Day or any sophisticated gathering. The individual servings add a stylish touch, while the zesty cocktail sauce and fresh lemon wedges enhance the shrimp’s natural sweetness. It’s an effortless dish that looks impressive and tastes divine.
Ingredients
- 1 lb cooked, peeled, and deveined shrimp
- ½ cup cocktail sauce
- Lemon wedges for garnish
Equipment List
- 6 small glasses or serving cups
- Small spoon for serving sauce
- Plate or tray for assembling
Preparation Time
- 10 minutes
Step-by-Step Instructions
- Prepare the glasses: Arrange six small glasses on a clean tray or table.
- Add the sauce: Spoon 2 tablespoons of cocktail sauce into the bottom of each glass.
- Arrange the shrimp: Evenly divide the shrimp among the glasses, hanging them over the rim for a professional look.
- Garnish: Tuck a lemon wedge into each glass, placing it neatly beside the shrimp.
- Serve immediately: Refrigerate if not serving right away, but serve within 1 hour for maximum freshness.
Additional Tips
- Use large shrimp (16–20 count) for a more dramatic presentation.
- Customize your cocktail sauce by adding a splash of horseradish or a dash of hot sauce.
- Chill the glasses beforehand for a refreshing touch.
This easy yet sophisticated recipe will make your celebration memorable!
7. Heart-Shaped Crispy Savory Polenta Bites with Marinara and Parmesan
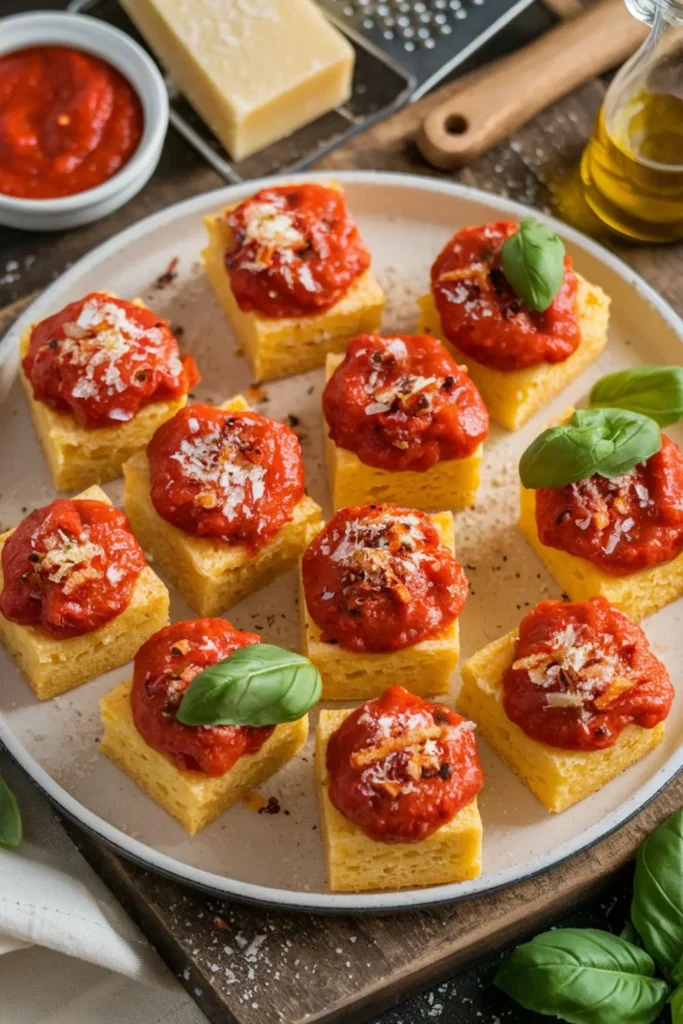
These crispy, savory polenta bites are an Italian-inspired appetizer perfect for parties or as a crowd-pleasing finger food. Quick to prepare and easy to customize, these bites are a guaranteed hit.
- Quick and Easy: Uses pre-cooked polenta to save time.
- Crowd-Pleaser: Perfect for gatherings, offering rich Italian flavors.
- Customizable: Add toppings like fresh basil, mozzarella, or a drizzle of olive oil.
Ingredients
- 1 tube pre-cooked polenta
- 1/2 cup marinara sauce
- 1/4 cup grated Parmesan cheese
Equipment List
- Sharp knife
- Heart-shaped cutter (optional)
- Non-stick skillet or frying pan
- Spatula
Preparation Time
- Prep Time: 10 minutes
- Cook Time: 10 minutes
- Total Time: 20 minutes
Step-by-Step Instructions
- Prepare the Polenta: Slice the pre-cooked polenta into 12 even rounds, approximately 1/2 inch thick. For a festive touch, use a heart-shaped cutter to shape each slice.
- Heat the Skillet: Place a non-stick skillet over medium heat and add a drizzle of olive oil.
- Fry the Polenta: Once the skillet is hot, add the polenta slices. Cook for 3–4 minutes per side, or until golden and crispy.
- Warm the Marinara: In a small saucepan or microwave, heat the marinara sauce until warm.
- Assemble the Bites: Remove the crispy polenta from the skillet and place them on a serving platter. Spoon a small amount of marinara sauce onto each slice, spreading evenly.
- Add Parmesan: Sprinkle grated Parmesan on top while the marinara is still warm, allowing it to melt slightly.
- Serve: Garnish with fresh basil or a pinch of red pepper flakes for an extra kick. Serve immediately while warm.
Additional Tips
- Make It Ahead: Fry the polenta rounds in advance and reheat them in the oven before serving.
- Topping Variations: Experiment with pesto, sun-dried tomatoes, or goat cheese as alternative toppings.
- Serving Idea: Pair these bites with a light salad or an assortment of other appetizers for a complete spread.
Enjoy these crispy polenta bites with friends and family for a simple yet elegant Italian-inspired treat!
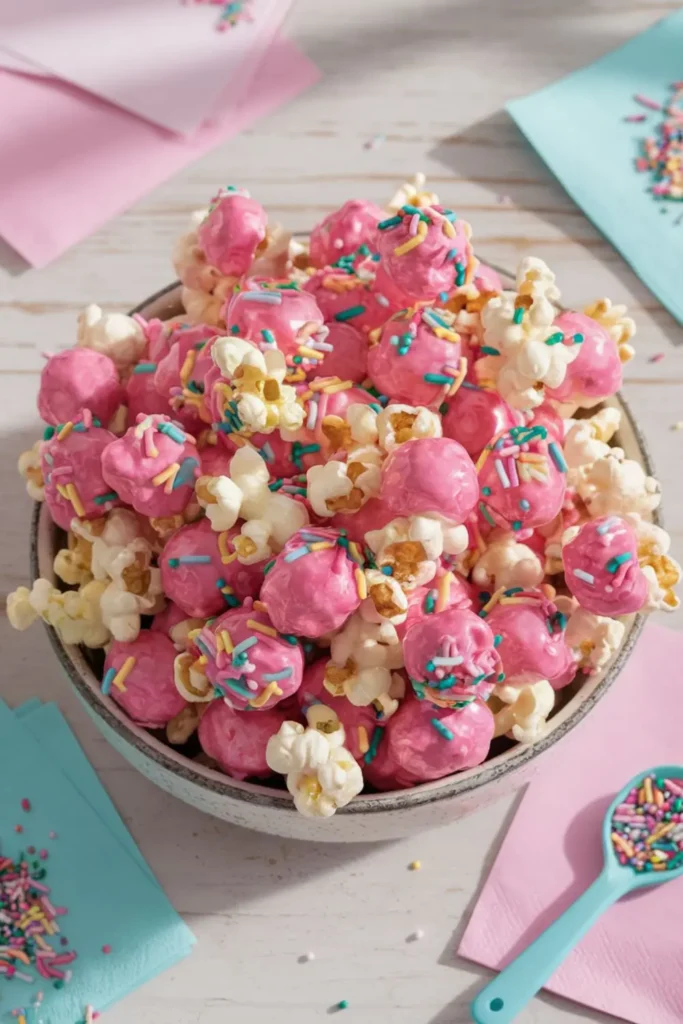
8. Pink Candy-Coated Popcorn Recipe
Why You’ll Love This Recipe
This Pink Candy-Coated Popcorn is the ultimate treat for parties, movie nights, or as a fun gift. Its delightful combination of sweet and salty flavors, paired with a festive pink hue and sprinkles, makes it a visually stunning and irresistible snack. Plus, it’s incredibly easy to make with minimal ingredients and effort, making it perfect for busy days or last-minute preparation.
Ingredients
Servings: 6
- 8 cups popped popcorn (unsalted and unbuttered works best)
- 1/2 cup pink candy melts
- 2 tablespoons sprinkles (choose your favorite shapes or colors for extra flair)
Equipment List
- Large mixing bowl
- Microwave-safe bowl or double boiler
- Spoon or spatula
- Baking sheet
- Parchment paper
Preparation Time
- Prep Time: 10 minutes
- Total Time: 10 minutes
Step-by-Step Instructions
- Prepare Your Workspace:
Line a baking sheet with parchment paper to make cleanup easy and prevent the popcorn from sticking. - Melt the Candy Melts:
Place the pink candy melts in a microwave-safe bowl. Heat in the microwave in 15-second intervals, stirring after each, until fully melted and smooth. Be careful not to overheat, as the candy can burn. Alternatively, use a double boiler for a gentler melting process. - Combine the Popcorn and Candy Coating:
Place the popped popcorn in a large mixing bowl. Drizzle the melted candy over the popcorn, using a spoon or spatula to toss gently. Ensure the popcorn is evenly coated but handle it carefully to avoid crushing it. - Add the Sprinkles:
While the candy coating is still wet, sprinkle the colorful sprinkles over the popcorn. Toss lightly to distribute evenly. - Set the Popcorn:
Spread the coated popcorn in a single layer on the prepared baking sheet. Allow it to cool and harden for about 10 minutes. This step ensures the candy coating is firm and ready to enjoy. - Serve or Store:
Once set, transfer the popcorn to a serving bowl, or store it in an airtight container for up to three days.
Additional Tips
- Popcorn Choice: Use air-popped popcorn or lightly salted microwave popcorn for the best results. Avoid buttery varieties as they can interfere with the candy coating.
- Color Variations: Swap pink candy melts for other colors to match different occasions, such as blue for baby showers or red and green for Christmas.
- Sprinkle Fun: Experiment with different sprinkle shapes and textures for a unique look every time.
- Extra Flavor: Add a pinch of sea salt to enhance the sweet and salty combination.
Enjoy this vibrant and delicious treat that’s sure to be the highlight of any gathering!
Try This Recipe;- Sweet Valentine’s Day Sugar Cookies with Royal Icing 2025
9. Strawberry Basil Bruschetta with Balsamic Glaze
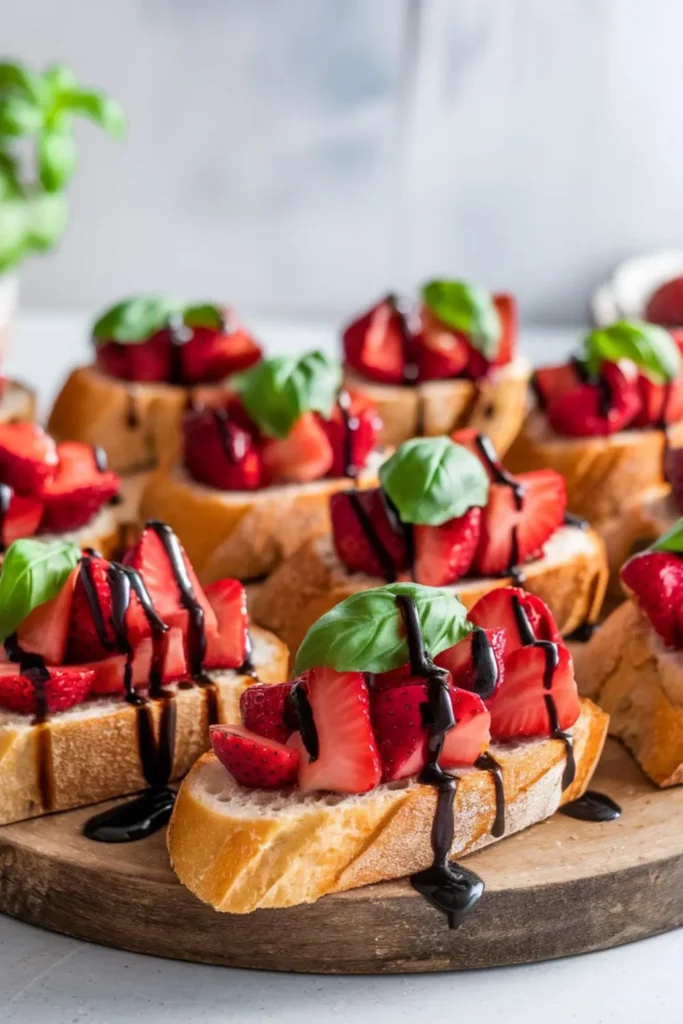
This sweet and savory twist on classic bruschetta combines juicy strawberries, fresh basil, and a drizzle of balsamic glaze for a refreshing and elegant appetizer. Perfect for Valentine’s Day or any special occasion, this recipe is simple to prepare and guaranteed to impress.
- Easy to Make: Minimal prep and only a few ingredients make this a quick yet impressive dish.
- Unique Flavor Profile: The combination of sweet strawberries, aromatic basil, and tangy balsamic glaze creates a delightful balance of flavors.
- Versatile: Works as an appetizer, light snack, or party finger food.
Ingredients (Servings: 12 bruschetta)
- 1 baguette, sliced into 12 pieces and toasted
- 1 cup fresh strawberries, diced
- 1 tablespoon fresh basil, finely chopped
- 1 tablespoon balsamic glaze
Equipment List
- Serrated knife
- Baking sheet or toaster oven
- Mixing bowl
- Spoon for topping
Preparation Time
- Prep Time: 10 minutes
- Cook Time: 5 minutes (to toast bread)
- Total Time: 15 minutes
Step-by-Step Instructions
- Prepare the Baguette
- Preheat your oven to 375°F (190°C). Slice the baguette into ½-inch thick rounds.
- Arrange the slices on a baking sheet and toast them in the oven for 5 minutes or until golden and crisp. Alternatively, use a toaster oven.
- Prepare the Topping
- In a mixing bowl, combine the diced strawberries and chopped basil. Gently toss to mix the flavors without crushing the strawberries.
- Assemble the Bruschetta
- Once the baguette slices are toasted and slightly cooled, spoon the strawberry-basil mixture onto each slice.
- Drizzle with Balsamic Glaze
- Using a small spoon or squeeze bottle, drizzle a light amount of balsamic glaze over each bruschetta.
- Serve
- Arrange the bruschetta on a platter and serve immediately to enjoy the crisp bread with the fresh topping.
Additional Tips
- Make Ahead: Toast the baguette slices and prepare the strawberry-basil mixture in advance. Assemble just before serving to keep the bread crisp.
- Customize: Add a spread of whipped goat cheese or cream cheese for extra creaminess.
- Balsamic Reduction: If you don’t have balsamic glaze, simmer balsamic vinegar with a bit of honey until thickened.
Enjoy these vibrant Strawberry Basil Bruschetta bites as a delightful treat for any occasion!
Try This For Great Valentine Day- Valentine Day Cupcakes: A Step-by-Step Guide to Baking Sweet Love
10. The Ultimate Party Centerpiece: Heart-Shaped Charcuterie Board
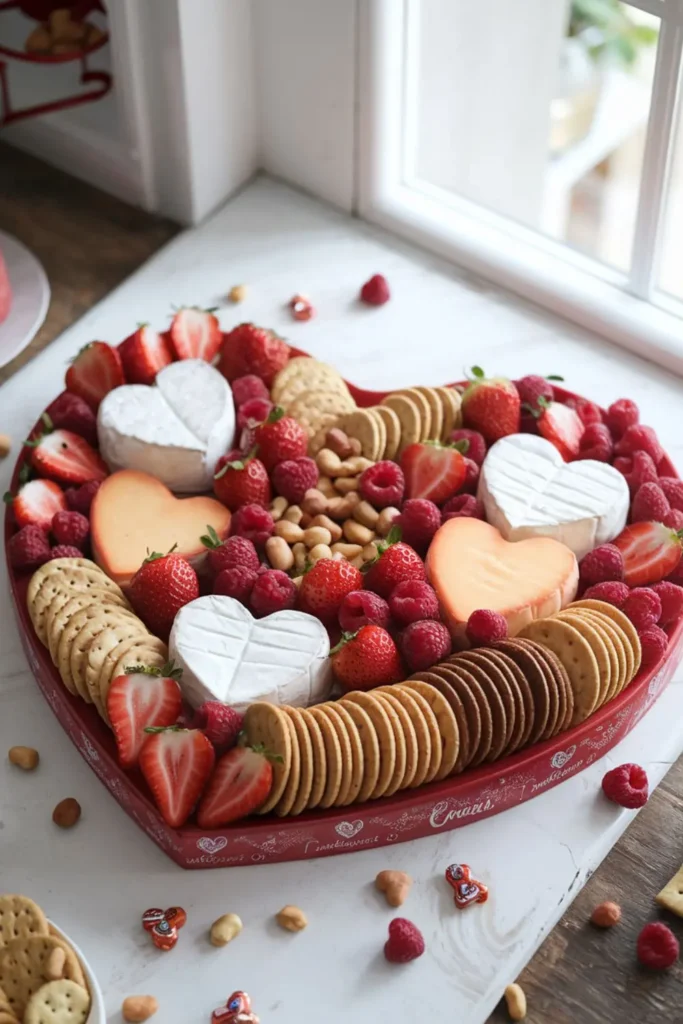
A charcuterie board is a timeless favorite for parties, and this heart-shaped version takes it to the next level. Perfect for Valentine’s Day, anniversaries, or any festive occasion, this board combines sweet and savory flavors for a truly eye-catching spread. The best part? It’s completely customizable to your taste and preferences, making it as fun to assemble as it is to serve.
- Simple yet elegant: The heart-shaped cheeses and vibrant fruits make this a stunning display without requiring advanced skills.
- Customizable: Add your favorite cheeses, fruits, and extras for a personal touch.
- Crowd-pleaser: Combines a variety of textures and flavors that appeal to everyone.
Ingredients
- Cheeses:
- 4 oz brie cheese, cut into hearts
- 4 oz cheddar cheese, cut into hearts
- Fruits:
- 1 cup strawberries, halved
- 1/2 cup raspberries
- Extras:
- 1/2 cup mixed nuts
- Assorted crackers
- Optional: Valentine’s-themed candies or cookies for decoration
Equipment List
- Large serving board (wooden or marble works best)
- Small heart-shaped cookie cutters
- Paring knife
- Serving utensils
Preparation Time
- Prep Time: 15-20 minutes
- Assembly Time: 10 minutes
Step-by-Step Instructions
- Prepare the Cheeses: Use small heart-shaped cookie cutters to cut brie and cheddar cheese into adorable heart shapes. Set aside.
- Wash and Slice Fruits: Rinse the strawberries and raspberries thoroughly. Cut the strawberries in half for easy serving. Pat dry to prevent excess moisture on the board.
- Arrange the Board:
- Start with the cheeses, placing them in clusters around the board.
- Add strawberries and raspberries in between the cheeses to create pops of color.
- Scatter mixed nuts in smaller gaps for texture and crunch.
- Arrange crackers in neat stacks or fanned-out patterns along the edges.
- Add Finishing Touches: Sprinkle Valentine’s-themed candies or cookies throughout the board for extra charm.
Additional Tips
- Cheese Options: Swap brie and cheddar for gouda, havarti, or pepper jack if preferred.
- Fruit Variety: Add blueberries, grapes, or dried fruits for more color and sweetness.
- Texture Balance: Include soft cheeses like goat cheese or creamy spreads alongside firmer options.
- Garnishing Ideas: Fresh herbs like rosemary or mint can add a refreshing touch and visual appeal.
- Serving: Provide small plates, forks, and cheese knives for easy sharing.
This heart-shaped charcuterie board is a beautiful centerpiece that tastes as good as it looks. Have fun experimenting with different combinations to make it uniquely yours!
Still Hungry Try This- 15 Best and Easy Healthy Dinner Recipes for All Hungry 2025