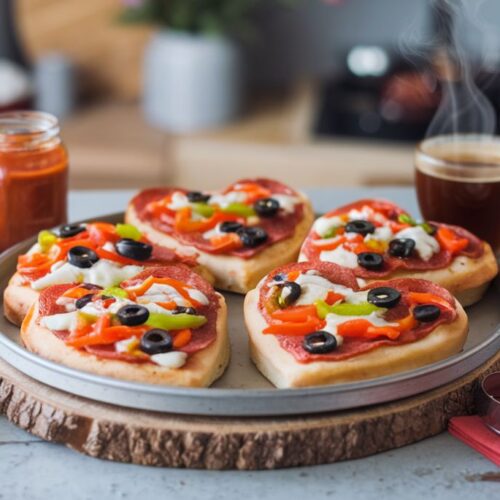
Easy Heart-Shaped Mini Pizzas Valentine’s Day Party Food Recipe
Heart-shaped mini pizzas are perfect for every occasion, from Valentine's Day to casual get-togethers. These adorable treats combine the universal appeal of pizza with a fun, customizable design. Whether you’re cooking for kids, a romantic partner, or a crowd, these mini pizzas are guaranteed to bring smiles. Plus, they’re quick, versatile, and require minimal preparation, making them a hit for busy weeknights or special celebrations.
Equipment
- Heart-shaped cookie cutter (medium size works best)
- Rolling Pin
- Baking sheet
- Parchment paper or a non-stick baking mat
- Pastry brush (optional)
- Small bowl and spoon (for the sauce)
Ingredients
- Servings: 12 mini pizzas
- 1 pre-made pizza dough store-bought or homemade
- 1/2 cup pizza sauce use your favorite brand or make it fresh
- 1 cup shredded mozzarella cheese
- Assorted toppings of your choice e.g., pepperoni slices, diced bell peppers, sliced mushrooms, olives, fresh basil, etc.
- Optional: Olive oil for brushing the dough edges Italian seasoning, or garlic powder for added flavor
Instructions
- Step-by-Step Instructions
- Preheat the Oven
- Preheat your oven to 400°F (200°C). Line a baking sheet with parchment paper or a non-stick baking mat to ensure the pizzas don’t stick.
- Prepare the Dough
- Roll out the pre-made pizza dough on a clean, floured surface using a rolling pin. Aim for a thickness of about 1/4 inch to ensure the mini pizzas bake evenly. Use a heart-shaped cookie cutter to cut out as many hearts as possible from the dough. Gather the scraps, re-roll, and cut out additional hearts until the dough is used up.
- Arrange on Baking Sheet
- Carefully place the heart-shaped dough pieces onto the prepared baking sheet, leaving a little space between each one to allow for slight expansion during baking.
- Add Sauce
- Using a small spoon, spread a thin layer of pizza sauce on each dough heart. Leave a small border around the edges to create a "crust."
- Sprinkle Cheese
- Generously sprinkle shredded mozzarella cheese over the sauce. Adjust the amount based on your preference for cheesiness.
- Add Toppings
- Top each pizza with your chosen ingredients. Get creative—mix and match toppings for variety. For example:
- Classic: Pepperoni slices
- Veggie Lovers: Diced bell peppers, mushrooms, and olives
- Gourmet: Fresh basil leaves and a drizzle of olive oil
- Optional Seasoning
- For extra flavor, brush the edges of the dough with olive oil and sprinkle with Italian seasoning or garlic powder.
- Bake
- Place the baking sheet in the preheated oven and bake for 10–12 minutes, or until the cheese is melted and bubbly and the crust is golden brown.
- Cool and Serve
- Allow the mini pizzas to cool for 2–3 minutes before serving. Transfer them to a serving platter and enjoy while warm.
Notes
Useful Tips
- Dough Options: Use whole wheat or gluten-free pizza dough for a healthier twist.
- Make-Ahead: Prepare the dough cutouts and toppings in advance. Store them separately and assemble just before baking.
- Crispier Crust: Pre-bake the dough cutouts for 2–3 minutes before adding the toppings.
- Kid-Friendly: Let kids customize their own pizzas with their favorite toppings.
- Leftovers: Store in an airtight container in the refrigerator for up to 3 days. Reheat in a toaster oven for best results.